Work principle
The code generates an analog signal using the internal DAC according to the PAL and NTSC standards described here.
Each image consists of two half frames (even and odd image lines). The blank level is at ~0.3V(values depend on PAL/NTSC). The synchronization is done using some pulses at 0.0V.
The following image gives an overview. Vertical synchronization is achieved by the purple pulses, horizontal by the red ones:

This image gives an overview of the signal of a image line (which is 64µs in total):

To generate the signal the internal 8bit DACs are used which can generate voltage levels between 0 and 3.3V at a ver fast rate using I2S.

Since the composite signal is defined between 0 and 1V just the DAC values of 0 to 77 are useful. This results in 54 gray values for the image.

Color is currently not implemented since it’s based on a frequency over 4MHz. We could generate a simple signal of 6.66Mhz consisting just of two values, but we would miss the target frequency and the phase shift would result in random colors. However this might be explored in a future project.
Parts
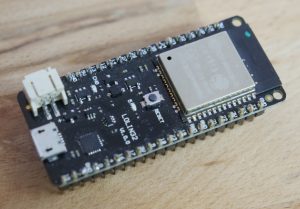
The part used here is a LOLIN32 board. But Any ESP32 board can be used.

-
Where to get them
These links are the cheapest I could find and also supporting our work (affiliate). I also ordered my modules there
LOLIN32 Board (~$6.90)
But there are also cheap modules on Amazon and eBay:
Amazon.com .ca .de .fr
Ebay ![]() .de .fr
.de .fr
The oscilloscope came quite handy this project. I really like it, check it out:
Amazon.com .de .ca .fr
Setup
The setup ist quite simple. Pin 25 hast to be connected to the inner of the yellow cinch connector and ground to the outer part. Just like this:

Code
The code is written in C++ and runs in the Arduino IDE. The Arduino ESP32 integration is needed to compile the code (Please follow the instructions here: https://github.com/espressif/arduino-esp32).
All the code can be found here. The README describes the repository contents:
https://github.com/bitluni/ESP32CompositeVideo
If you find errors or have some improvements just send a pull request on github… I actually read my messages there 🙂
Image to header converter
The Image class enables you to render gray scale images on the screen and the Graphics and Font classes allow to print text.
However, the image values should not exceed the maximum supported gray values which are currently 54. This has to be set in the converter before selecting the image. Higher values can be used as an transparency index. Fonts are Images of the ASCII characters starting from 32. Check the png of the font in the repository. The fonts can be converted using max value 255. Currently 0 is used as background and anything ales as foreground pixels.
The converted images can be placed in the project folder and have just to be included in the project. like this:
#include "luni.h"
Image<CompositeGraphics> luni0(luni::xres, luni::yres, luni::pixels);
...
{
  graphics.begin(0);  //clear screen black
  luni0.draw(graphics, 200, 10);
  graphics.end();
Check out the CompositeVideoSimple project from the github repository.
The 3D Engine
Sadly, there is not much memory available on the esp32. The most is used for the front and back buffer of the image. So there is no more room for a Z-Buffer on reasonable resolutions.
As a workaround this engine collects the triangles in a depth sorted tree and is rendered at the end. The buffer for the tree takes less space but more computing power. The size of this buffer
has to be set using the third parameter on creation of the graphics object(currently):
CompositeGraphics graphics(XRES, YRES, 1337);
The parameter describes the maximum count of triangles which will be drawn. Since the is back face culling implemented meshes of approx. twice the triangle count can be drawn. The mesh itself need additional space for transformed vertices. Im total models of around 2k triangles can be drawn on CGA (320×200) resolution which already fills almost the complete 200kb available at the start.

STL to header converter
This new version of the stl converter wraps the exported data in a namespace named after the source file.
The converted meshes can be placed in the project folder and included like this:
#include "venus.h"
Mesh<CompositeGraphics> model(venus::vertexCount, venus::vertices, 0, 0, venus::triangleCount, venus::triangles, venus::triangleNormals);
...
{
  graphics.begin(54);  //clear screen white
  model.transform(transfomationMatrix, rotationMatrix); //transform the vertices and rotate the normals
  model.drawTriangles(graphics, 40);  //enqueue the tirangles and sort them
  graphics.flush();  //draw the sorted triangles
  graphics.end();
Docs
Similar Projects
Send me a message if you know of any similar projects
My AM Radio transmitter. Also uses the DAC and I2S
My Oscilloscope as a Display Project. This uses the DAC. But I2S is used as camera input.
CNLohr’s video about NTSC signals on the ESP8266