This project shows how to generate composite audio and video at different sampling rates and techniques using the built in DACs of the ESP32.
You might want to check out the complete playlist on the development of an ESP32 based game console.
https://www.youtube.com/playlist?list=PLjUbKCHhzPEzCm2_KFAICIN-7QTap_s72
Parts
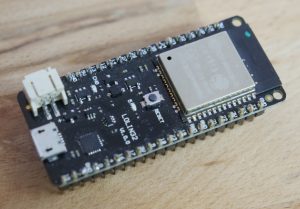
The part used here is a LOLIN32 board. But Any ESP32 board can be used.

These links are the cheapest I could find and also supporting our work (affiliate). I also ordered my modules there
LOLIN32 Board (~$6.90)
But there are also cheap modules on Amazon and eBay:
Amazon.com .ca .de .fr
Ebay ![]() .de .fr
.de .fr
The oscilloscope came quite handy this project. I really like it, check it out:
Amazon.com .de .ca .fr
Wiring
The wiring is quite simple. The video is connected to gpio 25 and the audio to 26. A capacitor of 10µF should be used to remove the DC offset.

Functionality
The video is running on 13.33M Samples over I2S. This sampling rate can only be achieved using the single channel mode of I2S. To be able to utilize the second DAC we can use a “hidden” special mode which lets the I2S FIFO write a constant value to the second DAC (Table 57 page 293 of the data sheet). The constant value can be changed any time from the code. This way we can set up a timer function to our desired sample rate of the audio and write the samples. The sampling rate of the audio is much lower compared to the of the video. Writing directly to the register of the second DAC does not work since it’s always overwritten by the I2S FIFO.

Code
The code is written in C++ and runs in the Arduino IDE. The Arduino ESP32 integration is needed to compile the code (Please follow the instructions here: https://github.com/espressif/arduino-esp32).
The easiest way to start is to try the example code. The AudioVideoExample.ino has some comments on what does what.
https://github.com/bitluni/AudioVideoExample
You can simply copy the example a a starting point of your project and add changed bit by bit.
Here are some essentials:
The FIFO mode to be able to use a constant value for the second DAC is set using these lines in the CompositeOutput.h :
 //untie DACs
 SET_PERI_REG_BITS(I2S_CONF_CHAN_REG(0), I2S_TX_CHAN_MOD_V, 3, I2S_TX_CHAN_MOD_S);
 SET_PERI_REG_BITS(I2S_FIFO_CONF_REG(0), I2S_TX_FIFO_MOD_V, 1, I2S_TX_FIFO_MOD_S);
The audio samples are written from the timer function (AudioOutput.h)
void IRAM_ATTR timerInterrupt(AudioOutput *audioOutput)
{
  uint32_t intStatus = TIMERG0.int_st_timers.val;
  if(intStatus & BIT(TIMER_0))
  {
    TIMERG0.hw_timer[TIMER_0].update = 1;
    TIMERG0.int_clr_timers.t0 = 1;
    TIMERG0.hw_timer[TIMER_0].config.alarm_en = 1;

    WRITE_PERI_REG(I2S_CONF_SIGLE_DATA_REG(0), audioOutput->audioSystem->nextSample() << 24);
  }
}
The timer is initialized in the constructor of the AudioOutput class.
the AudioSystem class handles the sound buffer and mixes all currently played sounds.
The header files generated by the editors below are included like this (the files are stored in the subfolders gfx/sfx of the project):
#include "gfx/sprites.h"
#include "sfx/sounds.h"
In the setup of the example the music is started in loop. The music is on index 0 of the wavetable, the amplitude of 1, and playback speed of 1 is used. The last parameter is enables the loop.
//Play first sound in loop (music)
 sounds.play(audioSystem, 0, 1, 1, true);
Playing a single sound using default amplitude and speed can be done like this
sounds.play(audioSystem, 1);
The return parameter of the play method returns an id that can be used to stop playing the sound again
int play(AudioSystem &audioSystem, int soundNumber, float amplitude = 1, float speed = 1, bool loop = false)
void stop(AudioSystem &audioSystem, int id)
All sounds played by a specific wavetable can be stopped by using
void stop(AudioSystem &audioSystem)
This way if music is grouped in one distinct wavetable looping music can be stopped any time without handling the previous ids returned by play.
Sprites are drawn using the function
void draw(Graphics &g, int sprite, int x, int y)
sprite is the index of the sprite to be drawn. The origin of the sprite will be set to x, y. The origin is defined by the first point of the sprite which can be set in the editor (see below). Additional points can be used as hit boxes etc. They can be read using
const short *point(int sprite, int point)
The resolution can be determined using
int xres(int sprite)
int yres(int sprite)
If you like to try a fancy project check out
https://github.com/bitluni/TetrisSpaceX
This shows how you could implement a game… even though it might need another refactoring.
The code for the editors can be found here, but you can also use the embedded editors below
https://github.com/bitluni/WavetableEditor
https://github.com/bitluni/SpriteEditor
Wavetable Editor
The wavetable editor has the possibility to store and restore complex projects as a .json file. This way you can modify your wavetable later. Exported .h can’t be loaded again since the original audio file is lost in the process. When storing .json and .h a link is shown which has to be clicked to store the file. When exporting .h also a .txt file is provided with the indices and file names for your reference.
? : open project stored as .json file
? : store project as .json file
? : add audio files
.h : export as header file
name : This is the name the files will and the wavetable in the code will have (just use characters valid for variable names)
normalize : the audio files will be scaled to maximum loudness on export
sampling rate : this is the sampling rate for the export. Higher rate will take more space. (44100 is CD quality)
(if you need more space use this link)
Sprite Editor
Just as the wavetable editor The sprite editor has the possibility to store and restore complex projects as a .json file. This way you can modify your sprite collections later. Exported .h can’t be loaded again since the original graphic files are lost in the process. When storing .json and .h a link is shown which has to be clicked to store the file. When exporting .h also a .txt file is provided with the indices and file names for your reference.
Use the mouse to add points to a sprite. The first point is used as origin of the sprite (if not set the upper left corner is used).. further points can be used arbitrarily.
? : open project stored as .json file
? : store project as .json file
? : add graphic files
.h : export as header file
name : This is the name the files and the sprites in the code will have (just use characters valid for variable names)
max gray value : the maximum possible gray value to be used (up to 255)
transparency : this is the byte value to be used to store transparency. (use something higher than your max gray value)
? : zoom in the sprites to set points easier
⌗ : cropping. all sprites will be reduced to the non-transparent portion. points will be adapted. Use carefully.. there is no undo. I use it after saving to .json and before export to .h so safe some space.
(if you need more space use this link)
Docs
Similar Projects
Send me a message if you know of any similar projects
https://bitluni.net/esp32-composite-video/
My AM Radio transmitter. Also uses the DAC and I2S
My Oscilloscope as a Display Project. This uses the DAC. But I2S is used as camera input.